Emanuel Greengrad is one of Israel's oldest experts in the field of observational astronomy. He traveled to see two solar eclipses and now he is also traveling to the expected eclipse in Antalya on 29/3/2006
Emmanuel Greengard
Photographing a total solar eclipse is not a complicated process if you understand that photographing this event has several special features that sometimes contradict each other and therefore require unique solutions.
First of all we will present the special features and then we will discuss how to handle them:
1. The size of the photographed object (sun/moon) is small (1/2/ of a height) and therefore the photograph with a "normal" lens produces a very small image on the photographic surface (film, video cassette, digital window) - therefore a telescopic lens or a zoom lens must be used .
2. If this is the case when photographing the total eclipse, the size of the "object" changes in that, apart from the sun/moon, the corona of the sun is added, which can reach 3-10 degrees. That is, from 6 times to 20 times. Therefore, if variable zoom cannot be performed, the degree of magnification required must be calculated.
3. In different video cameras, CCD's of different sizes are installed (usually 1/2 inch or 2/3 inch) - the size of the sun/moon disc is different.
4. The brightness of the photographed subject changes by hundreds of thousands of meters: from the situation before the eclipse, after the eclipse and during the partial eclipse (even when most of the sun is hidden) in which it is mandatory to use a light-absorbing filter to get significant details (and protect the viewer's eyes) to photographing the full eclipse in which it is mandatory not to use In no filter which is because the light intensity is extremely small.
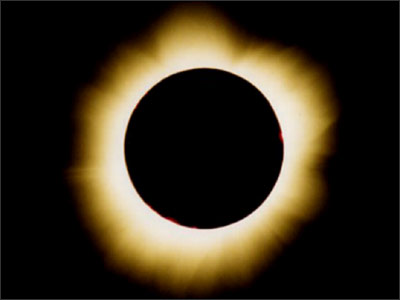
5. During the total eclipse, different details of the event require different exposures because their lighting intensity is different. For example, a photograph aimed at capturing the far borders of the corona will hide the gas hoses (red) because this area will be overexposed, and in contrast, a photo with a short exposure aimed at capturing the gas hoses will only show the near corona.
6. Since during the full eclipse there is not enough lighting to perform automatic focus, it is advisable to cancel the automatic focus and switch to manual focus where you set the distance to infinity.
7. There are several differences between photography on photographic film and photography using CCD (whether it is a digital camera or a video camera).
Lenses and resolutions
Because in digital cameras the focal length of the camera is different from that of the film camera and it also differs from one digital camera to another, we will use the values of the analog film cameras in our discussion. In the explanatory booklet of each digital camera, the identical value of its magnification ratio compared to the analog camera is also provided.
For example: in my digital camera (Nikon 4500) where the focal length is from 7.85 millimeters to 32 millimeters is indicated because it is the same as the focal length of 38 millimeters to 155 millimeters in an analog film camera.
It is recommended to make several attempts to understand which part of the photographic surface is occupied by the photographed object. This can also be done without a filter by photographing the moon at different magnifications (even in daylight).
In order to get a significant image of the eclipse, it is advisable to use a focal length of around 400 to 1200 millimeters. Shorter than 400 millimeters, the image will be small, larger than 1200 millimeters there is a fear that part of the corona will not be captured and also in cases above about 400 millimeters it is difficult to photograph without a tripod or without mounting it on a telescope or through a telescope that has its own stable tripod, because hand tremors will destroy the image . The figure below shows the relative sizes.

From this it can be seen that approximately over 1200 millimeters parts of the outer corona may not be included in the image.
My analog camera has a 400 millimeter telescopic lens that can also be increased to 800 millimeters with an additional screw-in lens. After several attempts, I decided to settle for the 400 millimeter lens because if the camera is not mounted on a tracking telescope (where I mounted the video camera - and more on that below) then looking for the eclipse with a large lens (and therefore a very small field of view) and a shaky hand will take so long May I not be satisfied with the pleasures of observing the eclipse with the naked eye. Also, the separation in the new photo films (even those with high sensitivity) is fine enough that the image can be enlarged, afterwards, to a size of 25x15 centimeters without loss of details.
If your camera is mounted on a tracking telescope you can use a focal length of 800-1200 millimeters provided there is no wind shaking the telescope. For large focal lengths, use the trigger cable connected to the camera trigger and do not press the camera trigger by hand - once again for fear of vibrations.
If the photograph is taken with a digital camera and the focal length is smaller than the values discussed above (see the Coolpix 4500 case) you can take advantage of the ability to edit and enlarge a digital image. Take a picture with the highest resolution (the maximum number of pixels) and keep it in the highest possible quality, so that after the picture is enlarged (at home using editing software and under no circumstances using the digital zoom of the camera itself: your hand shakes when taking the picture while the computer software that processes and enlarges is stable and has more processing options), will preserve as much as possible the sharpness of the image.
photographic films
The resolution of the photographic films is still better than that of the digital cameras, except perhaps for the most expensive ones. Therefore, you can choose the film that pleases you the most in the range of 100 to 400 ISO. The resolution in the low sensitivity films is better and on the other hand in the faster films the hand shake will be less noticeable because you can shoot with faster exposures. Hence, during the total eclipse where the lighting of the object is low, you should use the more sensitive films or, respectively, set a high ISO value on the digital cameras as long as it does not introduce noise into the image. Check the table below if you are able to set the recommended values considering your camera.
During the partial eclipse, which anyway does not have many details, but only the partly hidden sickle of the sun, the filter is the one that will reduce the light flux. Here, too, it is important whether a tripod is used or not.
Because of the recommendations (below) you will want to shoot at different exposures, there is also the question of whether this can be done with the camera you have by changing the key ratio (which will not affect the decision on the film speed - because for an object at infinity there is no problem with the depth of field of view) or by changing the speed ( since it will affect due to camera shake.)
From what was said above, you surely understand that I recommend fast films, a relatively large key ratio and a high shooting speed (and not the other way around).
Taking the partial phase
It is mandatory to use a filter to get details and protect your eyes
If your camera has an automatic light meter you can use it, but since you are probably interested in getting different specifications (the crown, the gas jets, ..) it is advisable to take additional photos in which you will shift the recommended photo value once towards a larger exposure and sometimes towards a shorter exposure (technique known as bracketing). In new cameras, this action can be programmed by instructing the camera to take a number of photos one after the other, some of which have a greater exposure and some have a smaller exposure. In old cameras you will have to change either the exposure time or the size of the key ratio to get the same result.
To determine the recommended values, you can use the camera's automatic light meter. If you don't have an automatic light meter, experiment by photographing, during the day, the sun through the filter when the key ratio of the lens is quite large, that is, the key number is small - let's say f/11 or /6.3 (since the eclipse is at infinity, there is no concern about the depth of field) and take a picture At different speeds from 1/15 of a second to 1/2000 of a second - open the photographs, evaluate them and record the best situation.
Past attempts resulted in the values shown in the first sub-table (upper left side) in the table below.
For example, in film with an ISO sensitivity of 400 and a key ratio of f/11, it is recommended to shoot at a speed of 1/1000 of a second. If your camera cannot reach such speeds shoot at f/16 and the exposure will only be 1/500 of a second. During the eclipse itself, start from this value, or from the value you found to be the best in your attempts, and perform bracketing by changing the speed.
Shooting the full stage
Must not use a filter
The amount of light here is much lower and you can't see anything through a filter - therefore it is necessary to lower it at this stage. Also, the amount of light does not allow automatic focus and you have to switch to manual focus.
As mentioned in the opening, in order to get different specifications, it is necessary to expose with different amounts of light, and therefore the following table should be used.
.
If we examine the table below for film at ISO 400 sensitivity and f/11 key we will find that the recommended speeds are 1/1000 for photographing the bursts, 1/125 for the inner ring and 1/2 or more for the outer ring. A considerable range that we must know how to handle.
Exposure times for solar eclipse photography - table
Due to the great excitement during the eclipse and its short duration, it is not the right time to consider different alternatives and therefore it is advisable to prepare an action plan in advance and follow it so that there is no need to waste time on decisions about the duration of the eclipse.
For example a table I prepared and used when photographing previous defects: the highlighted value is the recommended value as found in the table and in the attempts I made and the values above and below it are my values
The bracketing.

Therefore the recommended shooting strategy (for ISO 400 film and f/11 key ratio) can be:
(1) Cancel the auto focus and set the focus manually to infinity. During the full eclipse there is not enough light and enough details to perform autofocus. It is advisable to fix the lens in this position with adhesive paper or adhesive insulating tape so that it will not be displaced due to an unplanned touch.
(2) Mount the filter on the camera
(3) The duration of the partial eclipse: shoot when you start at 1/1000 speed and continue to 1/500
(4) A few seconds before the full eclipse begins remove the filter
(5) Start shooting at the same speeds as the partial eclipse (at least 1/500). Take the first photo right at the beginning of the total eclipse and you might be able to catch the famous "diamond ring".
(6) Continue shooting and lower the speeds to 1/250, 1/125, etc. up to 1/2 second.
(7) Take a picture immediately when the total eclipse is over and maybe you will now be able to catch the "diamond ring"
(8) A few seconds after the full eclipse is over, return the filter and take a photo according to the partial eclipse specifications.
If you use films with a different sensitivity and/or a different key ratio, build a similar table and shooting strategy.
My suggestion is to write down on a sheet of paper in large letters with a marker the steps to be taken, one after the other so that during the eclipse you don't have to waste time trying to remember what to do but follow the written instructions.
Photography and video
Before the eclipse, several experiments must be performed to determine what the correct magnification is - because the CCD sizes in the video cameras are different from one another. In order to convert the focal length values of the video cameras to the equivalent values of 35 mm photographic film, multiply by 5.2 for a 1/2 inch CCD and by 4.5 for a 2/3 inch CCD.
(1) Cancel the auto focus and set the focus manually to infinity. During the full eclipse there is not enough light and enough details to perform autofocus. It is advisable to fix the lens in this position with adhesive paper.
(2) Select the most appropriate optical magnification including the sun and corona. Since it's harder (but still possible) to zoom in on movies after the fact on a computer, in this case if the video camera is on a tripod or on top of a tracking telescope and the optical zoom isn't enough add some digital zoom.
(3) During the partial eclipse, photograph through a filter at the normal speed of the camera
(4) About 5-10 seconds before the eclipse begins, remove the filter. The reasons are to try to catch the "diamond ring" and also that it takes some time for the CCD to get used to the different amount of lighting.
(5) It must be assumed that a bright vertical stripe will appear in the first photo frames - it will disappear after a second or two.
(6) Occasionally change the shooting speeds of the camera to create the desired bracketing.
(7) About 5-10 seconds before the end of the eclipse, remove the filter for the same reasons listed in step (1).
the filters
Many materials that supposedly filter light are not suitable for use as a filter for viewing the sun because they may transmit ultraviolet (UV) radiation that is invisible but harmful to the eye. Therefore, the filter must be chosen carefully. There is also a difference between a recommended filter that can be used for viewing by eye but its optical quality is not sufficient for photography and between a recommended filter that can also be used for photography.
A simple and safe filter for viewing by eye is welder's glasses number 14 that can be bought at stores that sell construction equipment. The resulting image is sharp and green in color. The main drawback is that because of the thickness of the glass, a double image is obtained that can be eliminated by slightly tilting the glass - but because of this, it is not suitable for use as a filter for photography.
The second type of filters is a polyester or glass surface coated with an aluminum layer. The optical quality is much better - there is no double image - and this kind of filter can be used for photography. There are different compounds and different levels of filtering (high for viewing by eye (ND 5) and lower (ND 4) - but still safe - for photography, although it is also possible to photograph with the stronger filter). Therefore, it is advisable not to completely rely on the tables that will appear later and to perform, as recommended, several experiments to calibrate the camera and the filter. The resulting color of the sun is from white, through yellow to orange. The "spectaculars" provided by astronomical stores and to chapters by newspapers in preparation for an eclipse are made of this material and if they have chosen the material correctly they are safe.
The filters for photography can be purchased at astronomical equipment stores or you can buy the polyester surface and make a filter yourself. It must be ensured that the filter is the correct diameter of the camera lens / telescope body and that it is installed that way, as well as reinforced with adhesive paper, so that it does not fall during the observation time.
Care must be taken that the filter is flawless, especially with viewers using it with an optical device such as a telescope, binoculars and a telescopic lens because of the greater intensity of light that these devices emit. Therefore, check the filter carefully and if there is a (small) hole in it, cover the hole by sticking paper on it (on both sides). The optical quality in the case of small covers will not suffer.
.
Sources
The source for the instructions, illustrations and tables
And the highly recommended website that contains a lot of additional material on deficiencies
And also about my personal experience in photographing previous defects.
and the addition of the science site:
Yadan Astronomy 2 - transitions and deficiencies
https://www.hayadan.org.il/BuildaGate4/general2/data_card.php?Cat=~~~426282215~~~171&SiteName=hayadan
